Wednesday, July 31, 2013

try try..... day three

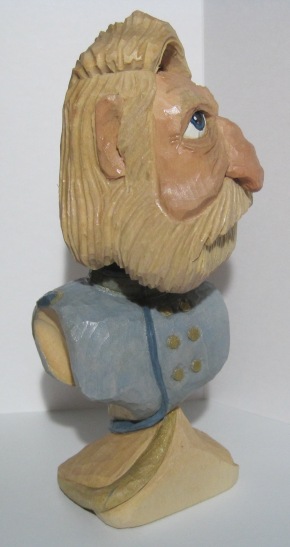
Well the soldier has a coat of paint and though he looks ok, he has some issues that I will need to address. I noticed that sometimes it isn't until the paint portion that issues show up and with this guy that is exactly what happened. Right around the nose area I have left too much wood and it doesn't look natural. I will address this as soon as the paint dries. A tip to save time and troubles; always make a bigger batch of paint then you will need and then you have the same color for any fixes that may occur. I honestly don’t usually do this but from this piece realize the value of the idea. Speaking of paint, I don’t like the way the painting portion came out either. The color is too bland and there is no emotion from the color. I will come back with some skin tone with a little red added to put some rosiness in his cheeks. I will also address the color of the coat and cap as they appear to me to be too strong in color. I want more of an antique look to this piece and will address this before I put the sealant on.
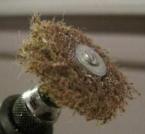
On the side bar of my blog where I share my picks you will see the 3M Scotch-Brite General Purpose Hand Pad. I take these pads and cut out 1 and 2 inch squares stack two together since they are thinner than the brown one shown earlier and used these to clean off the “fuzzies” from a carving. I can also come back after a carving is painted and gently remove some paint to give an antique look. In the pictures of the hooded face I have taken the pads and removed paint to test the pads and see how well they do. I am happy with the results and like the effect I got on this piece. I will consider doing something like this to the new soldier. After all he’s not supposed to look new; he’s from the civil war. That wasn't exactly last week now was it. 

Tuesday, July 30, 2013

try try again day two

Well I haven’t dropped it yet so I might as well begin carving the body, as I said I wanted to carve it as a great coat. I am not saying that my carving will be better than good; this is what the coats were referred to as, a “great coat”. There are many different versions of the coat so I grabbed a few pictures off of the internet for basic reference to flow and depth and began to carve. I am happy with the outcome though next time I may give more length to the body or maybe not do the cut out forming the base to give more definition to the coat itself. I did carve a grove in the shoulder to give a feel of layers, once it is painted I will get a better feel if this helped, hurt or had no impact. Here it is for now will be painting soon, so more to come. 


Monday, July 29, 2013

try try again............. I guess

Well I have to say I don’t like defeat, nobody does, and though the civil war soldier minus the cap came out well in the end I was still not happy that it broke in the first place. This is the second one I have carved just to have it break, so try, try again. That is exactly what I have done. I started a new soldier and hopefully I can make it all the way to the end of the process (and beyond) without dropping, breaking, or anything along those lines. As always I carve the head first and then afterwards I match the body to the head. I have always thought of carving the soldiers coat that has the layer over the shoulders and might attempt that with this carving. Here is the progress thus far, wish me luck.

Thursday, July 25, 2013

civil war soldier aka lemonade fini

As I said I wanted to make a few changes to the mouth and mustache line as well to the chin. Wanted a little more depth to these areas overall and wanted better detail to the mustache. It didn't look bad before but I think it looks much better now.
After finishing that up I  moved on to the painting of the body portion of the bust. in short, the uniform. I did some research and found that the Confederate officers had to supply their own uniforms so from what I understand from this, if they wished they could add items to the uniform to add their own style to the uniform. Kind of takes away from the whole "uniform" concept but the times being what they were. I decided that this gentleman being an officer was a bit on the showy side so he added a few items to make his uniform stand out. I didn't model him after any one person so his uniform is a simple design of bits and pieces I found on images of officers for the confederacy.


To complete the base design I tried to give it the look that the wood had been twisted like a piece of taffy. To highlight this I added color coming down from the uniform and a gold stripe as well. As I did with the barnstormer I used the little pad on my Dremel to soften the effects of the finish so the face wouldn't have a wet look but still have the protective qualities for the wood and paint. You can see in the last two pictures there is less shine on his face. On a side note I made his part go from left to right, which is usually not the way someone parts their hair. Most peoples part goes from right to left.........oops

Wednesday, July 24, 2013

Civil war soldier aka lemonade pt 3

Previously on Cartoons2Carvings

So how can I proceed from here, I feel I have two or three options; 
  1. I can carve away the cap and make him hat less, either bald or with hair
  2. I can throw away the head and start over and chalk this up to experience, lesson learned
  3. I can carve a new brim to match up and reinforce it somehow to the cap (least likely)
Well I can tell you even though #2 was one of my options this would not be the direction I would be going.  You see after I thought about it I realize that there is no lesson in throwing away a carving every time there was a mistake, a break or something didn't go as planned. The only lesson to be learned here is that as carvers we don’t make mistakes, we change direction, it’s that lemonade thing all over again.

After thinking about this for a bit and looking at my other carvings I realized that I haven’t carved a lot of hair lately, not on top of ones head that is. Most of my carvings in the past year, believe it or not, have had some sort of cap on. Wow, all of my carvings are wearing a cap of some sort so this made my choice even easier. Fixing the brim would have had some challenges but now I am almost excited to see if I can pull off the no cap carving. I don't believe this is a carving term but a "no cap carving" it is.
I started by simply removing the cap and the paint to see what I had left to work with, this was done the same way you clean up a rough-out before carving. Just take off a shallow layer to smooth things out and remove any markings. After this was completed I began to shape the hair area on top of the head to see if I would have him bald or would he have hair, I went with hair. There was enough wood left on top that I thought I could make a good head of hair for the old gentleman and that is what I did.   

So I was now happy with the hair and would refocus on finishing the body portion of the bust, but first I wanted to address the mouth area and the mustache, not many men I know have such a distinct perfect line there so before I move on there are one or two more modifications left to make. After all this is a caricature carving, exaggerated, whimsical, fun.

Tuesday, July 23, 2013

civil war soldier aka lemonade pt 2

Previously on Cartoons2Carvings
I got the carving done the evening before and by morning and at the point of this photo I would have to say, I was feeling pretty good about the whole thing. Things can and would change in an instant…………..

Yeah they changed alright, you see the table, floor or something shook and the head toppled down and a piece of the brim shot across the room only to be found four hours later behind the couch by my youngest son. Besides the few hours that I wondered what happened to the broken piece, this in itself would be a mild set back. After all every good carver has wood glue at the ready. So as any level headed carver would do I simply grabbed my wood glue and the broken piece and Voila!, finito, problem solved. So I thought.

I worked on carving the body portion of the bust for a few hours. Being happy with my progress, I began to paint the head. This is where the earlier issue reared its ugly head. I had the face painted and most of the cap when I proceeded to paint the brim. There was a line, a fault line showing through the paint. Right where the break occurred. After a bit of time goes by and numerous attempts to get paint to cover the area I put the carving down and headed off to bed. 

The next morning I get up, head out to the living room/workshop. There I see a now distinct gap between the cap and the brim where it had broke. I wondered how it was holding on. On my first and hopefully last side note of today, I paint a watered down color to allow the wood grain to show through, this would be to the caps down fall. After all, the carving is wood and wood and water don’t always do well together, at least not this time. So now I have a decision to make because the broken portion of the brim is no longer lining up with the rest of the cap and as you see there is not enough of the brim now on the cap to work for the carving. 


So how can I proceed from here, I feel I have two or three options; 
  1. I can carve away the cap and make him hat less, either bald or with hair
  2. I can throw away the head and start over and chalk this up to experience, lesson learned
  3. I can carve a new brim to match up and reinforce it somehow to the cap (least likely)
to be continued 
(hey you came back for this one)


Monday, July 22, 2013

civil war soldier carving a.k.a. lemonade

Ever heard the phrase “When life gives you lemons, make lemonade”? How many people get this phrase any more considering most lemonade is made from a powder nowadays. This is a topic for another day, to the phrase; my civil war soldier would become case in point. Let’s go back a day or so…….

I had decided after finishing my pilot carving and being fairly happy with the results that I would carve a civil war soldier. For my pattern I would use the one supplied in issue #33 of the Carving magazine written by my good friend Mark Akers. On a side note this issue as many others are available on back issue, worth checking out.

I had carved this soldier before from a 2” block of bass wood. Earlier this summer I had gotten used 12" band saw so I wanted to carve it full size as in the magazine. On another side note, if you had read about two or so posting ago you would know I went a good portion of the summer without carving. So I was still dusting off the proverbial cob webs but after my pilot carving I was getting back in the swing of things. So as I  always do I began with carving the head, more directly the face. This will determine how to carve the hat and impact the body type as well. I had carved the details of the face deciding on a basic beard, not getting to fancy with the cuts and curves of it. The two inch carving I did had squinting eyes but I wanted to do open full eyes for this one. I got the carving done the evening before and by morning and at the point of this photo I would have to say, I was feeling pretty good about the whole thing. Things can and would change in an instant……………..
to be continued

Wednesday, July 17, 2013

"Skinny Dude" carving

I recently decided to try carving a head from Lynn Doughty’s patented head rough-out. I made small modifications to it made the chin section longer in case I wanted to have a beard and I made it fit on a 3” piece of wood that I had. Once I cut it out I decided that 3 inches on the profile was ok but that 3 inches on the width of the face was too much so cut that down to 2 inches and this looked better. 

Now awhile back while carving with my buddy up in “billyburg” (Williamsburg for those out of townies) Bob, we did almost the same thing but on a different rough-out. At the time he said that I should carve the narrow piece just to see what I could do with it. Well at the time I thought about it got busy and forgot all about it. So while holding the thinner section of wood after cutting the rough-out down I remembered the challenge and thought “why not”. This would be one of those moments where there are no expectations of the piece because what else would I do with the wood any way, nothing ventured nothing gained. 

So here is the piece carved, right now the beard has a smooth cut to it but The old wood carvers law states: “Let no wood go un-carved”.Click the link to read the original story from the woodbee carver himself.

am thinking over the idea of putting in some cuts to highlight the beard. Not sure at this point, the smooth seems to match the design in a way, time will tell.

Moral of the story carve, carve, carve any piece of wood that is available. You never know what you might find hiding within the grain. 

Friday, July 12, 2013

Well it's a bust painted version


I painted the barnstormer pilot and am happy with the outcome. When I had first painted the jacket the color was too strong so to tone it down I took it to my Dremel tool with a pad that Bob gave me and what a difference, it not only helped me remove some of the paint but it also gave the finish a bit of a shimmer. With it being a leather jacket that really worked well and I will remember this for the next time. I can get the name of the pad for anyone who might want it.


The other issue I had to deal with was around the eyes. I didn't carve the eye creases that deep to create shadows so once the paint was applied it washed out my lines carved around the eyes for the most part. I had two options, to either re-carve this area then re-paint or to adjust the way I paint this area. I decided to try a new way of painting around the eyes and modified the color around the eyes to be a tad darker than the rest of the face. In the end I was happy with this call and will do this more in the future.

The other difference from previous carvings like the civil war soldier and the Santa ornaments was I painted the whiskers on the pilots face and hair as well. Normally I have gotten in the habit of leaving this unpainted, which I like because it highlights the wood and the grain. I actually wasn't happy with this after I had done it but am getting used to it now though I think in future carvings I will try to always have some un-painted wood.

Carve Diem 


Thursday, July 11, 2013

Collin Raye

I am and always will be a Collin Raye fan. When you think about songs the likes of “Love me”, “In this Life”, “Somebody Else's Moon” and “Little Rock” to name just a few, not forgetting “That's My Story” of course. As many know and some may not know, I am a softy when it comes to my faith, my family, movies and music. That’s just the way God made me and I make no apologies for that. Many of Collins songs still to this day stir the feelings I have for my wife and my boys. So what does this have to do with carving, nothing, nothing at all.

I wanted to share a new CD that came out back in 2011. Sorry, I am never up to date on anything, we just found Duck Dynasty this year. Collin has a CD out and it is wonderful and uplifting as he sings some beautiful hymns. Attached is the website for the album, take a moment and watch the video but be warned, you might need a tissue before it is done. Well worth watching and well worth the purchase for some great renditions of some traditional hymns done as only Collin can do them. I don’t usually do commercials on my blog but I had to let people know about this one, it’s awesome. With the world the way it is we could all use some inspiration right about now, kind of a refocus of the spirit.


For those who stop by for carving stuff, I will be posting the painted version of the pilot tomorrow hopefully. As my friend Mr. Mertz would say, “Would be carvers would be carvers if they would carve wood”. Well, what are you waiting for, get at it.


Tuesday, July 9, 2013

Well it's a bust

Last night I completed the lower half of the barnstormer pilot and for the most part I am happy with the results. I purchased some new tools at the end of April first of May time frame but hadn't gotten chance to use them. I purchased the tools from Drake Knives and highly recommend them. They have a nice comfortable grip that fits nice in your hand, and they are sharp ready to go to work the day they arrive. I purchased a #3 3/8 tool on recommendation of a carving buddy/mentor but wasn't sure how much time this tool would receive but after watching a clip or two of Ian Norbury carving worked it into my routine and love the way it carves.


On a side note when viewing a carving video not only pay attention to what is being carved but also the tools and how they are being used. Even carvers that carve a style different from your own can teach you something new if you are open to learning. Many of us can’t buy every tool that the established carvers have so we must be selective in the ones we do buy.

The bottom half of the barnstormer is a basic jacket collar with wrinkles in between for a scarf. I am anxious to get to painting him to see how he comes out. I carved the base with a double lip, kind of a bi-plane angle to the overall carving. Sometimes what we carve into the design is obvious to us but may not stand out to anyone else, but that’s o.k., it’s your carving.