Sunday, May 24, 2015


Here are two more of my little pine knot carvings. The first one is a simple face carving trying to keep it light as to match the wood. Before I began carving this I thought many would carve this as a more dramatic face but the cartoonist in me went the other direction. I considered carving something on the back as well but I like the way the outer portion frames in the face and knew I would loose some of that if I worked something in on the other side.
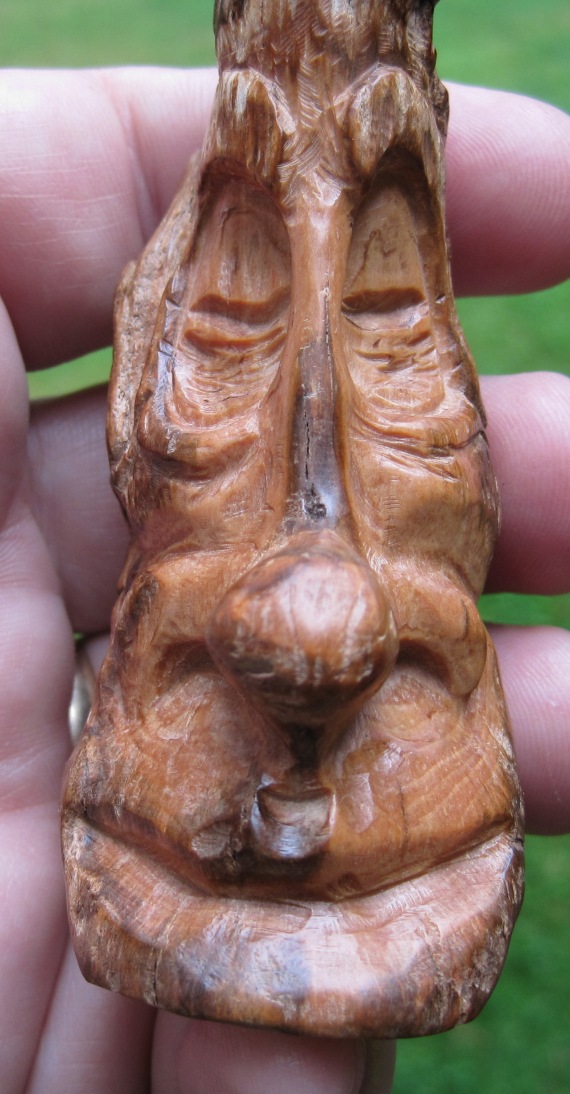
The second carving I cleaned the wood off from the top layer and then This one I kind of left it up more to the wood on what I would carve. When I first cleaned it off the was a portion protruding out and this with a bit of shaping became the nose. The rest fell into place once this section was established. with the way the wood had a certain curve to it I slowly began to see that this was the man in the moon and he looked so comfortable I thought he must be sleeping, and so he is.


as always happy trails
and
Carpe diem 4 carving

Thursday, May 21, 2015

I have been carving pine knots now that the weather has allowed some outside carving time. I still consider myself a novice at power carving but am getting more comfortable with each carving. The two shown here are the tips of two pine knot. I still have the main body to carve a larger carving but these give me time to experiment and I can carve to in one sitting with relative ease.

The first face I decided to let the shape of the wood define who was in the wood. The second I was just seeing how much I could play with the facial expression. I am fairly happy with the results although I am in my mind still being a bit timid in my carvings and not getting the depth I want to give me a strong profile. So far this seems to be my opinion only and am getting positive responses from most who see these thus far.

With this being a piece of pine I have to be mindful of the grain as the wood can chip small layers if not careful with the bits while carving. Sometimes as I am using a bit to smooth out or round a section I have a layer chip off.  Usually when this happens it is a small section and is easy to fix. You do have to examine the piece before carving to get a feel for cracks in the wood that may make an area sensitive to carving.

 as always happy trails
and
Carpe diem 4 carving
 

Saturday, May 9, 2015

Don Quixote pine knot carving


 This morning I put the final touches on Don. When I first started carving there was always the temptation to do more to a carving and sometimes this would be to the demise of the actual carving. I still try to carve as much into each carving as I can but now once I say that's it I try to stick with that decision.

With Don after I had put away the bits and sanded him down with my sand-o-flex and then buffed him out I saw a few places I would consider making a change or modification. Nowadays before I do anything else I ask myself what impact will it have, will it make it better or just different in any given area of the carving. After all I am not Michael Angelo and this is not the La Pieta so I don't expect perfection. In the end I am happy with the final product and am getting more comfortable with the pine knots and the process of carving them.

On a side note Gary Burns the "tree wiz" gave me some wonderful advise on how to keep the bits clean while carving;

"I have a piece of 2x4 on my carving bench that I just dig into when mine start clogging. If you carve a little trench in some soft wood like pine or fir the pitch seems to get pushed out some how. That is what I have been doing for years. My carving bench is riddled with places that I cleaned the bit out on. It turns into a sculpture all in itself eventually!"

Let me say this works wonderfully and has now become my method of cleaning the bits, I do it during the carving if they begin to clog and then again at the end before I switch bits.

as always happy trails
and
Carpe diem 4 carving


Thursday, May 7, 2015


Well I started a new pine knot the other day and everything was going pretty good, that is on the first day. The first day I was simply rough out the piece and setting up where the features of the face would be. I carved the nose a bit more  narrow than I would have liked but would address this more the next day I carve, I didn't realize how much this area would come in to play but for what I had gotten done the first day I was happy with it for the most part.

Day two of carving begins and for the first hour to hour and a half felt good with my progress. As I was working the nose area I noticed there was a small piece of what looked to be a stick on the lower right side of the nose. Every time I tried to shape this area more would crumble, I almost threw it out and said to heck with it. Then I thought why not work it out as best I can and worse case scenario I will have a better understanding of the limits to this type of situation.

So as I stated the more I tried to shape the area the more it would simply crumble so finally a took my carving burr and went straight into the decayed area to find out how deep this hole would be. Once I felt I had reached a stronger section of wood I pulled out the bit to see what I would have left. Then I applied the same technique on the other side to match up both areas. From there I shaped up the cheek bone area and then started working the cap. The more I worked this carving the more I began to see a Don Quixote type character and that is now the direction I am going with the carving the rest of the time. I need to add detail to the moustache and also work the lower jaw as most pictures don't have Don with a full beard. I will paint the helmet a tarnished looking gold and may try utilizing the wood burner to highlight the feather in his cap. If there is enough wood to do it I will make the base of this carving a brass barber's basin, this is what Don Quixote insisted that this basin was the enchanted helmet of the Moorish king.

I will post more as I progress, until then and  

as always happy trails
and
Carpe diem 4 carving

Thursday, April 30, 2015

pine knot carving

 Well a new discovery was made today in reference to carving pine knots. I saw a video a few years back where a Sand O Flex was used to clean up a carving from any fuzzies or scraps still on the carving. Well I recently got one and though I haven't used it on a bass wood carving I did experiment with it on a pine knot carving. I have to say it did great though it did seem to leave a film coloring on the carving, but everything looked smooth and clean so I didn't think anything of it.


Then today I finished a second carving and as I did before I used the Sand O Flex to clean up the carving and of course same as before. Maybe it was because the color of this piece of wood seemed to be a bit darker but the color distortion seemed even more evident and this would simply not due. So I got out a buffing wheel from my Dremel and began to go over the face with mild pressure. To my amazement it not only began to clean up the wood it was as if it was taking the film on the wood and using it as a wax. Not only was I getting a cleaner piece of wood but it was giving it a luster and also seemed to bring out all the colors of the wood. I was so excited about the results that I got out the carving from the other day and began to do the same on it. The carving in the end has a look as if a sealant coating was placed on the wood. I have placed a sealant coating on previous carvings but was always unsatisfied in the end. The carving would look great but the wonderful scent of the wood was gone. Now if this works I can get a finished look to the piece and still preserve the wonderful scent of the pine.

as always happy trails
and
Carpe diem 4 carving