Tuesday, June 28, 2016

I can't get a handle on it

So I got these gouge handle cutouts a while back and decided to use them up. Now for me personally I love the tools I have and the handles they came with but there are many carvers out there that love changing out the handles for carved handles. That is actually how I got these, I had a carver ask me if I had ever carved any handles and would I consider carving him a few and so I did. 


But now I have these new handles and need to see if I think outside the box and carve them more like the originator had intended and honestly the answer is no. This doesn't mean I don't like the carvings I did but if I am being honest, and I am this is not how they are normally carved.


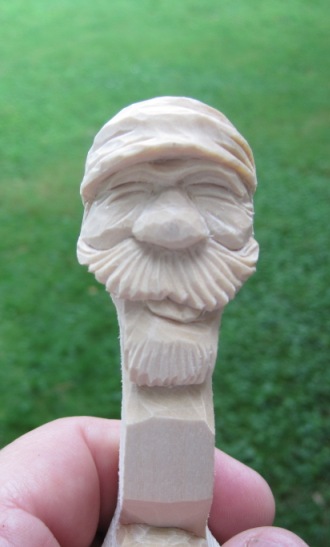
Upon carving the fourth handle, (these are two handles on one piece of wood that meet in the middle) knowing that I had no plans on putting these on my tools I had a thought. How would it look if I took the two carvings and blend the middle so that a portion of it works for both. So now I have a jockey that has the color not on his jersey but on his pants and those same colors will be the colors coming down from the tie the gent is wearing. The last two images are one and the same, with each being held upside down, or right side up dependent on your point of view. For those I may have confused with this I will get these painted up and then will post the end results for your viewing pleasure.


as always, 
"Good night and may God bless"


Thursday, June 23, 2016

a new old one has emerged pt 2


 Well this one is done, what fun. I carve some that get entered in competition and some that end up being placed in my shop for sell and then like this one it's all about the fun of not only carving but piecing him together to have a final staged carving. In the same way I would pick up this and say I should add this to that was the way I approached painting him. It didn't hurt that I have Sci-Fi fans in the family. My youngest would look at what I had done and would suggest colors he thought would match up with the whole Jedi spoof. He wanted the beard painted grey but after I had applied the color I wasn't happy so I came back with some faint white and then again with some faint blue for his beard. The only thing I have considered is adding some dry white to the beard today but we'll see. Overall I think he's a fun one, now to find him his place on the desk.

as always, 
"Good night and may God bless"

(and may the force be with you)

Tuesday, June 21, 2016

a new old one has emerged

 Well sometimes you just have to step outside the box and see what you can do. This fellow I had carved up on the farm this past spring and the hand I had carved maybe two years ago. So I thought why not attach the arm and see how that will look and then it hit me. While I was preparing to attach the hand I saw that I still had some left over blue rod from the other project and this got my mind spinning. So I grabbed a piece of wood dowel, and set it up to be placed in the hand, drilled the appropriate size hole in the hand so that he could keep a steady grip on the dowel. Then for the final piece de resistance, I drilled a small hole in the wood dowel and attached the blue rod.

He really has become a fun little carving now with the additional pieces, the only thing left to do is possibly carve a hood into the top and then of course I will add some color to him. You may have noticed the action shot in the second photo, that's because I snapped the image right when he began to lean over. Because he seemed a little off balance from now having a hand I gave him a base to stand on. The top of the base was done when I was testing out my Dremel router set-up and I have to say I was very pleased with how easy it was to use and how easy it worked even on a piece of a tree trunk. I loved the first image I got of him on his base the lighting really worked well but being an old Photoshop guy I had to play a little with the filters, just cause I can.

as always, 
"Good night and may God bless"

Sunday, June 19, 2016

a few more ornaments

Well in the last week or so I stuck to my plan and carved a few ornaments. The first one here was a carving I did from a piece of scrap wood. It wasn't totally square and was longer than I needed to carve a Santa so I included a chimney. I haven't made the call yet but was pondering the idea of hollowing out the chimney from below to help lighten the weight of the ornament though it's not heavy by any stretch of the imagination. Then if I cut small portions in the top of the chimney to let light shine through that could be a nice effect but I need to see if I have enough wood to do this and not mess with the integrity of the overall carving.
 This second one is a funny story, though it wasn't at the time. I wasn't feeling good one night and my back was a bit out of sorts so I decided to carve to get my mind off of it. I carved this angry elf and wasn't happy with the facial expression so at the last minute and with no planning I carved a body below him. But as he was carved from another piece of scrap wood so there wasn't really enough wood to carve the arms properly. So right before he became kindling I decided to go back to the original idea and just have him as an ornament and removed the lower portion. I like the way the bottom of the ornament looks but this time it was a fluke and not a planned design, not the first or the last time this will happen I am sure.
 Lastly is one of my ornament carved on a corner cut piece of wood. This for the past few years has been the main way I would carve an ornament, as I have just recently played around with carving my ornaments in the round. This guy reminds me of an old English sheep dog where all you see is fur and a nose. He is a happy fellow to say the least. You may have noticed that he is very thin so do to the limited wood and the light weight of the carving I chose not to hollow out the back on this one. I may add a magnet to the back to give someone the choice of hanging him with a hook or putting him on the fridge. He and all three should be fun ornaments once they are painted.


Happy Father's Day to all the dads everywhere 

and as always, 
"Good night and may God bless"  

Saturday, June 18, 2016

something new

Well today I tried something new, I designed a t-shirt for wood carvers. There are shirts out there but many are crude in nature and some are just not honoring our passion. So I decided instead of complaining I would see if I could come up with a design people might like.

I decided to keep it light and use one of my water color cartoons as the main image with simple text.

as always, 
Good night and may God bless

Tuesday, June 14, 2016

found wood another carving pt 6


Sometimes you just have to walk away from something or it will consume you, then again they say what doesn't kill you only makes you stronger. Well this probably fits in there somewhere because yesterday I went out to my garage with one simple task, to simply glue down the pieces that haven't been already and it was only two things, the pilot and the blue tubing going from the rocket to the pilot. But as I was setting it up in the correct position and making sure the glue was firming up to hold it in place I noticed something out of the corner of my eye, the left over blue rods. So of course I thought, "what about the other knot in the pilot and look there is another one on the rocket, and look there are some rods left over. So what else could I do but connect the two knots with the blue rod. I have to say I am getting good at bending this stuff and after three different times I got it done and on a base none the less, and now the rest of the story........


as always, 
"Good night and may God bless"

Monday, June 13, 2016

found wood, another carving pt 5


Well to make a long story short, I got the nose piece to hold and carved some detail into it. I even took the end of a paint brush and used it in the very tip of the nose of the rocket and then the painting began. I got the rocket all painted up and then proceeded to paint the pilot, this is where it got tricky. I hadn't actually had anything set in my mind for how I would paint him. But in the end I think I did it in a way that everyone so far seems to be happy with the results. I will admit to you that part of my decision on what color to paint was from all the comments that this little guy seemed to resemble a well known beagle from the papers. In the end I wasn't overwhelmingly happy with this guy but as the days have passed he has grown on me. So now there is one final touch to apply and he will be a completed carving.


as always, 
Good night and may God bless

Thursday, June 9, 2016

found wood, another carving started pt 4

So now that I am building a rocket it will need all the additional parts that give it that rocket look, remembering that this is to look like a Sci-Fi rocket from those old movies that we grew up on, of course some saw them in the theater and some saw them on late night television. On the back I hollowed out the main body and carve the main thrust where it fit into the main body and is attached by a piece of copper wire. But then the first issue emerged. The front of the rocket had a big knot in it so I cut a portion off to see how big it was, wow it was big. But there is a fix for everything, usually, lights please......


 So as you may have seen in the video I had to make some modifications to the nose of the rocket due to a knot in the wood. This is the chance you take when you carve these found pieces of wood, there are always things you have to include, exclude or simply carve around or cut out from the carving. But after all this is what is fun about this found wood, it's not just that you "found" a piece of wood on the ground, though you did but it's also what or who you find in the wood as you are carving.


as always, 
Good night and may God bless


Tuesday, June 7, 2016

found wood, another carving started pt3


Well as I was pondering what this will be I found another piece of found wood with a similar knot in it and I have decided to incorporate this into the carving. So now the vehicle has an external tank. I will be looking into how I can connect the two knots with each other but first I need to carve in some detail to see how this will match up with the pieces already carved. Once the external tank was attached I decided this will be a rocket ship and will be made to look like the spaceship from the sci-fi movies from days gone by. This thing is slowly coming together and I am already planning the next piece for it. After I complete the detailing to the external tank, I will look at my scrap pile of found wood and see if I can carve out the propulsion section for this ship. I am planning on flames and all so this should be fun.

as always, 
Good night and may God bless

Monday, June 6, 2016

found wood, another carving started pt2


Well after looking at this guy I decided the little circles carved in didn't look right so I hollowed them out, I also removed the circle cut into the corners of the mouth. Once I was done with this I started to ponder what this guy was going to be. To find this answer I went out to the pile of found wood and looked to see what I had to work with and low and behold there was my answer. I had a larger branch that I could carve a face in or I could remove a portion of the branch shooting off to the side and this will be his base.


First I needed to get it set-up. So after looking at this I carved out an area that would be a cockpit of sorts and then began to hollow it out so he would fit comfortably in it. Now we have moved from making him a simple base to some sort of vehicle that he will be sitting in. This begs to the question which way will he face in it? One way he could be in a submarine and the other way he could be in one of those old timey race cars. Both look good but which way matches what I have already carved and leaves me with more options to finish the carving up. I think this one is going to turn into a fun project, yes project, it is no longer just a carving. This is never good when I go from carving into project mode, trust me on this one.


as always, 
Good night and may God bless

Sunday, June 5, 2016

found wood, another carving started

 The other day I started a piece of found wood and somehow came up with this little guy, not sure what he is supposed to be but isn't he fun. With the found wood, I always start with shaping the piece of wood to see what I have to work with and what direction I may want to go with it. This wood is a bit harder than bass wood, it is closer to a butternut when it comes to carving, though the grain in some ways could be considered resembling cottonwood bark. I have found at times that the utilization of gouges is not an effective approach and doesn't always result in clean straight edges. For this wood I do a version of stop cuts that seems to be more productive in the long run.

For this wood I also make sure I have a sharp edge on my blades and find myself stropping more than I would with bass wood or even butternut. I find the best approach is using one of my older knives for the roughing out and shaping and saving my nicer blades for the detailing. Even though they may not carve as well at this stage I am only removing unwanted wood so there is no finesse to this part of the carving. Don't get me wrong, the blade needs to be as sharp as you can get it to be productive with this wood. All in all this is a fun wood to carve but it can be a workout opposed to other woods I carve. Then of course there is the issue of knots coming up in the wood. This wood is fun due to the shape due to the branches and knots but it also can make keep an open mind on what you are going to do with the carving. You may have a great idea and then hit a knot and realize you need to modify the design in order to save the overall carving. You may also decide to make the knots and knots holes part of the overall design, but that is for another day.

as always,
Good night and may God bless