


 Well I have purchased a bag from Darlene and I have to say it is wonderfully made and fits the tools perfectly. She is easy to work with (not sure if she would say the same, I had a lot of questions) and can match up a bag that fits your tools. This bag is two fold, it is a carrying bag but inside it has an attached tool roll to secure the tools. She can even embroider a logo on your bag if you have one.

 So to paint the goggles I started by painting a watered down
bit of red right in the center. I followed this up with taking a less but still
watered down blue and painted it into the edge of the glass then worked it in
towards the red. I took a mildly wet brush and washed out some of the color both
red and blue. Finally I painted a few faint white lines to give the look of
refraction on the glass. The strap of the goggles I painted in an army style
green as a way to work in the Army Air Corp patch on the tassel. Finally the
leather flight cap I painted a darker brown for the indents in the cap to make
sure it would stand out more. All in all I was happy with the goggles. I wonder
if the carving itself suffered because of my obsession with making the goggles the
center of my attention. This by the way is a bad thing and I try not to get too
wrapped up into any one feature of any carving that the rest suffers. I am
hopeful that this was not the case with my latest efforts.
So to paint the goggles I started by painting a watered down
bit of red right in the center. I followed this up with taking a less but still
watered down blue and painted it into the edge of the glass then worked it in
towards the red. I took a mildly wet brush and washed out some of the color both
red and blue. Finally I painted a few faint white lines to give the look of
refraction on the glass. The strap of the goggles I painted in an army style
green as a way to work in the Army Air Corp patch on the tassel. Finally the
leather flight cap I painted a darker brown for the indents in the cap to make
sure it would stand out more. All in all I was happy with the goggles. I wonder
if the carving itself suffered because of my obsession with making the goggles the
center of my attention. This by the way is a bad thing and I try not to get too
wrapped up into any one feature of any carving that the rest suffers. I am
hopeful that this was not the case with my latest efforts. 

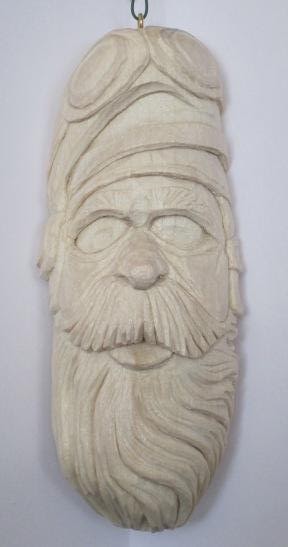

 So I have re-carved a design I had carved back last spring,
the pilot Santa but this time on one of my larger size roughouts. There is a
lot I am happy with but there is one area that stands out every time I look at
this piece. More on that later for now here is the newly carved Santa pilot
with a new and improved goggle design carved in.
So I have re-carved a design I had carved back last spring,
the pilot Santa but this time on one of my larger size roughouts. There is a
lot I am happy with but there is one area that stands out every time I look at
this piece. More on that later for now here is the newly carved Santa pilot
with a new and improved goggle design carved in. 


 So I have now painted and completed two of three Santa’s.
This was a roughout I struggled with because it was not as deep as the other
roughout. I was not as happy with this one at first and my wife really
encouraged me to trudge on and finish the carving. One of the issues was that a
portion of the cap chipped out and I had to make an artistic decision and
rework the carving design. I like the finished product and once it was painted
it really came together. The other was that I didn’t have a strong comfort zone
on a shallower roughout. This was partly why I ordered it to challenge my
carving abilities or the lack of, which ever the case may be.
So I have now painted and completed two of three Santa’s.
This was a roughout I struggled with because it was not as deep as the other
roughout. I was not as happy with this one at first and my wife really
encouraged me to trudge on and finish the carving. One of the issues was that a
portion of the cap chipped out and I had to make an artistic decision and
rework the carving design. I like the finished product and once it was painted
it really came together. The other was that I didn’t have a strong comfort zone
on a shallower roughout. This was partly why I ordered it to challenge my
carving abilities or the lack of, which ever the case may be. 
 I have noticed that I have carved one or two that when I
looked back I almost liked them better before the paint was applied. I have
also had a few that I really liked but then the paint was applied and it really
came together. The finished painted
piece was even better than the carving by itself. Maybe it’s just me but I love
the process and watching a carving change as I go through the stages. I try to
keep images of both carved and then painted carving. Even though I have a
standard way I paint the Santa ornaments each one seems to still have their own
unique look once the paint and wood come together. The only variance with my
application is how thick or thin I apply the color. For my own personal preference,
I prefer the wood grain showing through the paint if ever so slightly. AS for ornament today, I think it really came
into its own once the paint was applied. Hope you think so too.
I have noticed that I have carved one or two that when I
looked back I almost liked them better before the paint was applied. I have
also had a few that I really liked but then the paint was applied and it really
came together. The finished painted
piece was even better than the carving by itself. Maybe it’s just me but I love
the process and watching a carving change as I go through the stages. I try to
keep images of both carved and then painted carving. Even though I have a
standard way I paint the Santa ornaments each one seems to still have their own
unique look once the paint and wood come together. The only variance with my
application is how thick or thin I apply the color. For my own personal preference,
I prefer the wood grain showing through the paint if ever so slightly. AS for ornament today, I think it really came
into its own once the paint was applied. Hope you think so too.


 Well I have gotten a few carvings done and have also painted
them up as well. This time I changed my system a bit and got a few carved and
once all the carving was done I began to paint. Usually I carve one, paint it
and move on. Since I knew I had the three roughouts I just decided to carve
them all three in a row before moving on. This was all in an effort to undo the
cobwebs from not carving for over a month. I think it worked out well for me
and for the carvings.
Well I have gotten a few carvings done and have also painted
them up as well. This time I changed my system a bit and got a few carved and
once all the carving was done I began to paint. Usually I carve one, paint it
and move on. Since I knew I had the three roughouts I just decided to carve
them all three in a row before moving on. This was all in an effort to undo the
cobwebs from not carving for over a month. I think it worked out well for me
and for the carvings. 
 Ain't it the truth, your tools can have great impact on your
carvings. Now don’t get me wrong I don’t mean the amount of tools you have to
work from, no, I mean the shape of your tools. I have been carving the last few
nights in a row and don’t remember how many hours my tools had logged before
the holidays and the long break from carving. My tools began to let me know by
tearing instead of cutting the wood. Breaking pieces off instead of trimming
down the wood. Now I was working from a roughout and on one side the grain
seemed to be working against me in regards to the carving. I still believe the tools were a factor as well. So last night instead of carving I got out the strop
and my tools. The next time I carve I hope to see a vast improvement on my
cuts, we shall see. I have never really mastered using a stone and am not in position
right now to purchase a sharpening system so hopefully I will get back on
schedule with the strop every hour or so. This makes a major difference in the
edge of the blade.
Ain't it the truth, your tools can have great impact on your
carvings. Now don’t get me wrong I don’t mean the amount of tools you have to
work from, no, I mean the shape of your tools. I have been carving the last few
nights in a row and don’t remember how many hours my tools had logged before
the holidays and the long break from carving. My tools began to let me know by
tearing instead of cutting the wood. Breaking pieces off instead of trimming
down the wood. Now I was working from a roughout and on one side the grain
seemed to be working against me in regards to the carving. I still believe the tools were a factor as well. So last night instead of carving I got out the strop
and my tools. The next time I carve I hope to see a vast improvement on my
cuts, we shall see. I have never really mastered using a stone and am not in position
right now to purchase a sharpening system so hopefully I will get back on
schedule with the strop every hour or so. This makes a major difference in the
edge of the blade.

 Back at it that is. Since Thanksgiving at least one or more
members of our family had been under the weather. My wife and I both ended up
with bronchitis, tis the season. Everyone is feeling better and back to the old
schedule and once again I am carving. I ordered some roughouts from Mark Akers,
thought this would help me dust off the cob webs. Mark has a fast turnaround from order to delivery which makes it nice for a carver in waiting. I had carved one of his
previously and was happy with the result so thought I would give it another
try, you know make sure it wasn't a fluke or something.
Back at it that is. Since Thanksgiving at least one or more
members of our family had been under the weather. My wife and I both ended up
with bronchitis, tis the season. Everyone is feeling better and back to the old
schedule and once again I am carving. I ordered some roughouts from Mark Akers,
thought this would help me dust off the cob webs. Mark has a fast turnaround from order to delivery which makes it nice for a carver in waiting. I had carved one of his
previously and was happy with the result so thought I would give it another
try, you know make sure it wasn't a fluke or something.