Wednesday, May 30, 2012

a rough roughout


I haven’t posted in awhile with the holiday and all. I did have a small project I recently got done and it seems to be working out for me quite well. You see I don’t have a machine to do roughouts nor do I have the budget to buy roughouts every time I want to do a carving so I got inventive, of sorts. I wanted to carve some Santa carvings on a piece of 1 ½” by 1 ½” by 4” corner cut but once I got the wood in half how would I cut out the pattern. 
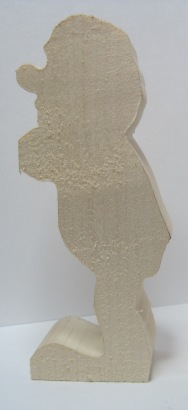
So this is what I have done. I took a flat piece of 2” wood and placed the pattern on that. 
From there I used my v-gouge and cut a v right down the center of the wood. I then turned the piece over and placed the outline of the carving on that took it to my scroll saw and cut away. I then took a few pieces of scrap wood and made an “L” shaped piece that I place my corner cut on. 

Then on top of that I place my silhouette with the v cut on the bottom and with a pencil in a slight angle out from the wood transfer my pattern onto the corner cut and to the scroll saw we go. Now this is not a perfect solution but it works quite well for what I am trying to accomplish.


This takes me to my next task which is trying to improve on the style of my carvings, which has been made easier by an extremely generous friend. Knowing the small assortment of tools I had to work with I was given an extremely nice supply of knives and gouges for my very own. I can't thank this person enough it has opened my eyes to what a real carving knife can do. I know many people are in the same position I am with raising a family in today's economy. So many of us getting by using X-acto knives or pocket knives. My advice is simple, buy yourself at least one good carving knife. If possible an inexpensive set of gouges. After using the knives I received I came to realize how hard I was working just to make a basic cut. The other issue, the clean cuts you can make with a proper knife that you can't with improper tools.

I use Amazon for a lot of my purchases like this. The nice thing is you can check out the reviews to get an idea of the quality. Worth checking them out and see what is available. One of the basic chisels sets I found you can look at in the carousel provided on the left of this blog.


As I have said a number of times, research it out and if possible get into a carving group. You learn so much and nothing like hands on training and many carving magazines have a list of carving groups in your area. It is worth checking into.

Tuesday, May 22, 2012

New stock, old cartoons

Well now that I have some new stock to carve what am I going to do about it? That's easy, I pulled out my folder of some of my oldest cartoons and I found a few characters that I thought might be fun to carve. Since I have 1 ½” and 2” wood I thought I would start with the 2” and carve that first. I have rough cut two of the three and after roughing it out it seemed 2” was too wide. I decided to cut it down and this will give me a skinny practice piece as well a thicker piece of both characters. Maybe after I carve the skinny rough out the thicker one will seem to give me so much more to carve, maybe not. In the not so distant future I will carve a piece from a magazine or book and then I will carve from an instructional DVD. I want to compare and see which way works best for me when it comes to learning new procedures in carving. I have noticed I am lazy and don't take the time to read the article like I should. How do you learn best and what is your main resource? If anyone has any to share let me know. 


Sunday, May 20, 2012

Bought some wood


Well I recently bought some bass wood and I have to say I was thrilled with the service. I had a few options but nothing locally so I decided to try a company in Wisconsin, HeineckeWood Products. I placed my order on the 11th of this month and I received my shipment on the 17th. Now let me start by saying the shipping time was impressive but not the most impressive thing about the product, the most impressive was the wood itself. I order both 1 ½” and 2” and to my surprise it came at the exact size. Some places tell you it can be a 1/4” off due to surfacing, not this it was the exact size. Shipping was competitive and timely. All in all this is a great company to buy your wood from. They charge no minimal amount, a competitor on the web required a purchase of at least 25 dollars, and they were priced higher than Heinecke Wood Products which meant I would have to pay more for less wood. All in all it has been a pleasant shopping experience and would recommend them again. I have seen a link to their page on many wood carvers sites but thought you might want to know why so many wood carvers promote this company. 

Thursday, May 17, 2012

color contrast pt 2


Well the king is finished and his name is Ryan, which happens to be my son’s name who told me not to give up on this carving. We found out as well that the name Ryan in Gaelic translates to “little king”, what better name for the king of the leprechauns. This carving started out as a corner piece, you know, a carving from a practice stick that is only done one half of the block. Well after I had carved out the front side and Ryan (my son) showed an interest in having him in his room I thought I should carve out his back side as well. The funny thing was I had already begun to paint him, you see for some reason my son not only wanted me to save this carving but he also wanted him to have a red beard. So I started to carve him, broke his nose (trying to muscle the wood, bad idea), finished the initial carving, but I’m not done yet. Second half, started to paint him, decided to carve the back side, carved off some of the old paint with minor changes to original design and repainted him. 


From all this was born Ryan, king of the leprechauns. I have added more pictures than I normally would but wanted to give you a good look at the transition he went through. All in all it was worth it and it taught me a lesson in carving. No matter what mistake was made and no matter what you thought it would end up to be complete each carving and see how it looks complete.


Michelangelo once said “Every block of stone has a statue inside it and it is the task of the sculptor to discover it”.

Wednesday, May 16, 2012

color contrast

Color truly brings a contrast and I have openly said that with my current supplies, I am limited in painting supplies. Now of course I could go out and buy a full supply of paints but I am not ready for that yet. Although most carvers use similar techniques to paint their carvings, there are variations from carver to carver. I will be researching this in the near future but I want to find a way to paint my carvings to have a water color look to them. Right now the paint is heavy and covers the wood completely. I know there is a way to apply paint and still have the wood have a presence, more on this later.

There are three factors (in my mind) in getting a completed carving. I know I might be breaking it down into too simple of terms but for now I am not only trying to improve upon my skills but also trying to form a process to my carving that will keep me consistent in my work. I have broken it down this way, basic carving; where you proceed from rough out to the basic form of a carving. This will be followed by the detailing process. This will be when you go into the details that make this character come through and stand out from other carvings that you have done. This will be followed by the painting process and I truly believe that this can be a make or break it time. Color can reduce a wonderful carving down to a cartoon like character. It can also diminish the idea that this was carved from wood if put on too heavy.

I have painted some of my cravings just to get into the process and to pick and choose what I do and don’t like from each, the main thing as I have said before is I don’t like it covering the wood completely so that it (for me) takes away from the wood itself. Isn’t this why we carve we love the wood, the look the smell and the feel of a carving made from wood? I have attached a picture that show a carving I have been playing with before some of the detailing work.

This one I was carving and the wood on the nose chipped away and I thought I was going to have to discard the carving. My youngest son told me he still thought it could look nice so I continued on with my efforts. See for yourself if he was right. I am in the process of painting him for my son, and will add those pictures shortly. 

Monday, May 14, 2012

to paint or not to paint


Well after I painted the last two pieces and was not happy with the outcome I pondered whether I would or would not paint lil’ billy. Well last night I decided to paint the little man and here is how it came out. This one I am very happy with and here is why. I toned down the colors, the last one I painted had really bright strong colors and it just looked to cartoony, I know right, you would think from my perspective that this would be a good thing. But if you have ever looked at my water color work or my color pencil work I don’t like bright colors. I try most of the time to give it a toned down, one person referred to it as antique-ish in style.
The beard is actually layered colors where I started with a pretty strong brownish orange and then every layer after that I darkened the color.
The hat band was a little bit of brown with a touch of red and a small touch of white in trying to give it a leather look. I almost did the same with the vest but decided to go with the green instead.
The jeans color was made from three colors, a deep blue with some white added in with a small bit of black to give it a worn look.


All together I am happy with the way it came out and like the look it gave the carving. The way a carving is painted can either make or break a carvings design. I still have a lot to learn about the proper way to finish off a carving, remember these are my practice pieces, but for the most part am happy with the progress so far.

Should there be a call to arms for lil' billy? 

Saturday, May 12, 2012

To arms


You may have noticed that the character on the previous posting was seemingly arm less. I thought for this one I would try to carve the arms separate and attach them. I got one of the arms mostly carved out and attached it temporarily with some glue but not sure that I am happy with it. It to me looks way to stiff so I will try and carve out arms with a bend at the elbow and maybe having the hands bent and resting on the belly. I am still struggling with getting clean detail in tight areas but will probably improve upon that when I get some gouges. I still want to find a way with getting into tight areas and still getting clean cuts out of them. So here is a glimpse into the arms and how it looked when it was added, like I say not happy with it but will possibly attempt a different arm for it.


 I have also included a few pictures of the little guy now that I have added more detail. You can see that I am still getting fuzzy cuts at times and not getting a clean carving. More work ahead, much more work ahead.

Friday, May 11, 2012

Silly hill billy

 So as I wrote earlier I carved the hill billy from the Carving Magazine article. Since I had another piece of wood it would fit on I carved out two more. The difference was that the second one had to be modified due to the length of the wood. Once I was ready to carve I decided to carve this one first since there would be some changes in its design. I basically carved it in the same way I would carve the other one just with minor modifications. I gave him a vest and a shirt and pants opposed to the overalls.

Some of the problems I have had are dealing with getting clean cuts in tight areas. Some of it could be after carving for awhile that the blade is dulling out. Some of it I believe is the technique I use to cut out areas (or lack of that is). I will look through my magazines and see if anyone ever addressed these issues and how to deal with them. I know some carvers use different systems to brush away the fur balls from the wood once they are done carving. I will try to share a few of those in the upcoming segments.

There are so many wonderful carvers out there and most of them teach either through magazine articles, videos or actual classes. Most of these carvers have been carving for years and have a wide array of tools in their arsenal, so they teach from that perspective. This can be hard for the beginner or the intermediate carver trying to get a foot hold on carving.

The answer to this is to take a class or two when ever available. Many carvers post their teaching schedule on their websites. Some magazines have carving clubs listed in the back of their magazines as well. If possible find and join a carving group so that you can feed off of each other in knowledge and skill. Unfortunately in my area there are no carving groups that I have found. As I research and find answers to my questions I will post what I have found here. Any time you have a link or an article that addresses questions being brought up forward them on and I will post them as well.   
So here are a few pictures of my latest attempt at a carving, more to come, same carving time, same carving channel.

Tuesday, May 8, 2012

Painted up


Well last night I painted my little Santa head so for the most part he is done. Now I did not carve in the eyes due to the size of the piece (I also need to improve my skills in this area) and I didn’t paint them in either. The previous Santa carving that I did was a free hand carving and with this since it had a more cartoon image I did a simplified carving for the eyes and painted it as if it were a cartoon on the page. I didn’t feel that style would match up with this carving so I left it alone.

Years ago I had seen some folk art carvings. With these they just carved out a socket section and painted in the eyes, white area then a dot, normally blue. Back then I copied this style since this was the style that inspired me to carve in the first place. Then about three years ago my boss that gave me two rough cut duck heads for Christmas and that got me temporarily back into carving again. The key event was when I purchased a magazine because it had an article about duck carving. It also had an article about a caricature carver with a wonderful spread on his work. On that day I realized if I was going to carve this was going to be the direction that I wanted to go in. This was either a historical day or a hysterical day, yet to be determined.
So this Santa doesn't have eyes carved or painted. Does this hurt the carving, and or is this a caricature carving no no? Your thoughts are welcome on this issue as always.

Monday, May 7, 2012

My own design


Now I will be the first to admit that I can over think the simplest of things. For the longest time I really battled with the idea of converting a drawing or cartoon to a rough cut for carving. I keep wondering what the process in doing this correctly is.  I had never found a single article that addressed this issue, and wondered why it was such an elusive topic for carvers.  

So while waiting for the answer to my question and to get some practice at carving from a rough cut I opened my summer addition of Carving Magazine. There are many wonderful magazines out there but for my money this is definitely one worth the money, no matter what level of a carver you are. From that I carved my version of the Helvie knife hill billy. This was carved for the article by Mark Akers. His is really a nice carving handle that he has made for Helvie knives. My attempt was not on a knife handle and probably a little larger than his knife handle but was a fun assignment none the less. In the article there is great information on how to carve out the beard and what gouges he prefers. Unfortunately for me the gouges used in the article are not in my arsenal so I had to work with what I had on hand. Which in turn means my hair and beard do not look as good as the one in the article. In the end I was happy with the end result minus the painting (still need to challenge myself in this arena). 


I after completing the hill billy I decided to try my hand at one of my cartoons, the one in the previous blog post. You can get an idea of the size based on the pencil sharpener it rest on. I need to work on carving eyes but other than that I was very content with the way this one came out. The biggest obstacle was the actual rough cut, the pattern was obvious and this alone made this a success. For those of you who don’t over think things this might not make sense but for those that do like me the light finally came on. I will be applying paint in the next day or two and will post it when it is complete. One thing I take away from both carvings is that it is how you interpret the rough cut not how you layout the pattern for rough cut.

For the two of you who read this blog questions and comments are always welcome yet not required. Feel free to contact me any time.


Sunday, May 6, 2012

Painting wood versus paper


As I explained before I painted the Santa using my limited supply of colors. I actually don’t think of this as a bad thing necessarily since it has been years since I have painted any of my carvings. My skills as an artist have improved in regards to painting which is good but what is bad is that most of my work on paper is with water color, mostly water color pencils.


With water color you have, like all paints, the effects used with layering the paint. The difference though is the effect of the somewhat transparency in color. Using the right technique you can either darken or lighten the color after it is applied. You can actually remove color in areas as well, which helps with shading and texture. With painting carvings you are not applying any shading techniques, you are applying color to match a certain look to your carving. If you are carving a cowboy has he been on the range for some time or is he all cleaned up to go courting? The way he is painted will answer many of these questions.

I will share more on this as I learn more myself, but for now I need to continue to improve my carving technique. I want my cartoons to come to life in wood. Here is a cartoon of Santa I did awhile back. Although I like the Santa carving I did I don’t know if it matches with my cartoons yet, but they will, one day they will.  

Thursday, May 3, 2012

A look back and why


Back in the early 90’s when I had just begun carving I wasn’t as particular about the wood I would carve, I at times got creative in my carvings. I worked at a local hardware store and as I was putting away some stock returns when I got an idea. You see I had been putting away some chair legs that a customer bought and then couldn’t use. As I was putting them back in the bind where they belonged, being that they were made from wood of course my first thought was “what could I carve this into”. Well here is the result of my efforts.

Now you might wonder why do I spend time with showing old carvings like this, well for one it will be a way for me to track my progress as a carver. Also it is my way of showing people that you can be creative with your craft, but more importantly, if you just go at it without any effort to learn the process then it will limit the skill level you can reach. It all depends on what you want to do and what you want to do with it.


“I am a poor man and of little worth, who is laboring in that art that God has given me in order to extend my life as long as possible.
” 
Michelangelo